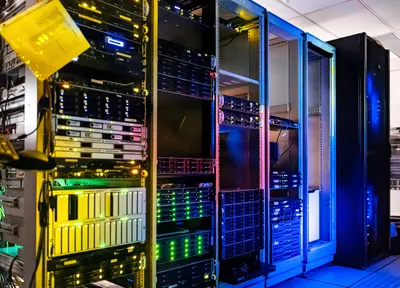
Server racks at the NOIRLab Headquarters Computer Server Room in Tucson, Arizona, in 2011. | Wikimedia Commons
issue #194 of brennan.day
Homelab For the Beginner: You Can Self-host Your Own Server on $50 Hardware

brennan.day — issue #194
Publisher: Brennan Kenneth Brown
Place of publication: Calgary, Alberta, Canada
Available at: https://brennan.day
Contact: mail@brennanbrown.ca
Building on my last post about the Gemini and Gopher protocols, I realized I wanted to take a step further in helping others reclaim web autonomy and sovereignty. So I'm writing this guide.
A few months ago, I wrote about permacomputing and computing for the apocalypse where I briefly spoke about self-hosting and creating your own homelab. But I did not get into the "how-to" at all.
I want to do that today, because I took another swing at creating a homelab, and though there was a lot of trial and error, I was overall really impressed by how much capability and functionality you can get out of old, inexpensive hardware.
I originally shelved the project in January and put it on the backburner, because I'm the stereotypical dev that enjoys hopping from one new shiny idea to another. But more than that, I am not a full-stack web developer. I stick to the front-end and JAMstack, avoiding databases, backend, and DevOps altogether.
But the Internet doesn't actually work that way. Sure, you can use Netlify or Vercel to host and deploy your front-end static sites or Astro.js solution or whatever else you might be building, typically for no cost. But this means you're relying on a company that could suddenly begin charging you money or change their licensing. Regardless, it's a fragile solution, albeit a really convenient one I'm still using.
I want to build for the long web, and really, homelabbing can be a fun, useful hobby.
What Can Be Self-hosted, and Why?
Before we get into hardware, I want to make the case for why this is worth doing at all. It's easy to look at a list of Docker containers and wonder why the hassle is worth it.
Every service you use daily that you don't control is a liability. Companies shut down, or change their pricing, or get acquired, or start monetizing your data, or make unethical decisions that don't align with your values. I'm sure you've been there.
Self-hosting is the practice of running your own software on your own hardware. Taking back ownership of the tools you rely on. Here's a taste of what's possible:
- Instead of Google Drive/Dropbox → Nextcloud or Seafile. Your files synced to all your devices.
- Instead of 1Password/LastPass → Vaultwarden, a lightweight Bitwarden-compatible password manager you host yourself.
- Instead of Feedly/Feedbin → FreshRSS or Miniflux. Read the web on your own terms.
- Instead of GitHub → Forgejo or Gitea. Your repositories, with no Microsoft or genAI training on your code.
- Instead of Discord/Slack → Matrix/Synapse or Mattermost. Private and federated.
- Instead of Google Photos → Immich. A beautiful, fast, self-hosted photo library with mobile backup.
- Instead of Notion → AppFlowy or a simple DokuWiki. Flat-file format with no lock-in.
- Instead of Twitter/Mastodon (someone else's instance) → GoToSocial or Mastodon. Your own Fediverse node, so your posts live on your server.
- Instead of Substack → Ghost or a static site generator like Hugo.
- Instead of Google Analytics → Umami or Plausible. Privacy-respecting analytics that don't treat website visitors as products.
The Spectrum of Homelab
It's important to be mindful that homelabbing is a very wide spectrum: You can have 48U 4-post cabinets in a dedicated, soundproofed, climate-controlled server room with redundant 30 kVA online double-conversion UPS systems backed by a natural-gas automatic standby generator.
Or, you can have an old Android phone or a $15 Raspberry Pi Zero with a 2GB microSD serving index.html with the command darkhttpd /home/pi/site --port 8080.
The overwhelming majority of home servers are far closer to the Pi Zero: A decommissioned work laptop, or a tower pulled from someone's curb, a SFF (small form factor) desktop bought at a garage sale. A machine considered e-waste can actually run web services, drawing only ~40–60 watts from the wall.
My Philosophy
A popular reason people get into homelabbing and self-hosting is for private streaming of your personal media library, which is usually pirated. That's fine with me, all the power to the pirates! But that's not what this guide is going to be about.
Primarily, this is because software media systems like Jellyfin are resource-intensive compared to the services I'm going to be going over. Hardware transcoding, large media libraries, and multiple simultaneous streams ask too much of modest old hardware.
My homelab, running at brennan.cafe, is a privacy-focused and self-hosted personal infrastructure built on sustainable principles. It represents a journey away from corporate cloud services toward digital sovereignty and ethical computing.
Why?
- Privacy: Take back control of personal data
- Learning: Understand the technology you use on a daily basis
- Sustainability: Make use of existing hardware rather than consuming new resources
- Freedom: Break free from vendor lock-in and surveillance capitalism
Principles
- IndieWeb: Own your content, interact with others on your terms
- Permacomputing: Sustainable, mindful computing practices
- FOSS: Free and Open Source Software exclusively
- Privacy: Zero tracking, no surveillance, respect for users
Step Zero: Finding Your Hardware
Where do you get hardware for a homelab, self-hosting server? Anywhere, if you know how to look. With both RAM and storage options becoming increasingly, absurdly expensive, I can only recommend buying used from the following places:
- Thrift stores and Goodwill: In many cities, you can walk into a Value Village or local Goodwill and find towers and desktops from 2010–2016 selling for $20–$40. They're usually wiped, sometimes missing a hard drive, occasionally missing RAM. That's fine. Bring a USB stick with a Linux live image. Boot it up in the aisle (yes, you can ask staff). Check that the machine POSTs, that the CPU fans spin, that USB works.
- Facebook Marketplace and Kijiji: Search "computer" filtered under $60 and sort by distance. You will find a graveyard of machines people are desperate to get out of their spare rooms. HP EliteDesks, Dell OptiPlexes, Lenovo ThinkCentres. All workhorses built for enterprise, which means they're far more reliable and better-cooled than consumer hardware of the same era. Look for machines with an Intel Core i3/i5/i7 from the 3rd–7th generation, or an AMD FX series, ideally with at least 4 cores and 8 GB of RAM.
| Spec | Minimum | Sweet Spot |
|---|---|---|
| CPU | 4 cores, 2.4 GHz | 4–8 cores, 3.0+ GHz |
| RAM | 4 GB | 8–16 GB |
| Storage | 120 GB SSD | 250 GB+ SSD |
| Network | 100 Mb/s | 1 Gb/s Ethernet |
| Power | Anything with a standard ATX PSU | — |
Having a solid state drive will be far faster than a mechanical hard drive (the shiny metal ones that are much heavier), though they do have a shorter lifespan. If the machine you're buying has an HDD, budget $20–$40 for a used SATA SSD (Samsung 860 Evo, Crucial MX500), but keep the HDD for backup.
What To Avoid
- Small form factor HP/Dell machines with proprietary power supplies (they fail, and replacements cost more than the machine itself, I learned this the hard way)
- Anything with a Core 2 Duo or older unless you're only serving the most basic webpages.
- Machines that have been stored in damp conditions (smell the vents)
My Homelab: The Tower in A Basement
| Component | Specification |
|---|---|
| CPU | AMD FX-4130, 4 cores @ 3.8–3.9 GHz |
| RAM | 7.24 GiB DDR3-1333 |
| Storage | 228 GiB SSD (Samsung Evo 820) |
| Motherboard | Gigabyte GA-78LMT-USB3 (AM3+ socket) |
| Network | 1 Gb/s onboard Ethernet + USB Wi-Fi adapter |
| OS | Lubuntu 26.04 LTS (Resolute Raccoon) |
| Desktop | LXQt / Openbox |
My own humble homelab server is a custom Acer Gigabyte full-tower I originally bought off Kijiji at the start of the pandemic six years ago for my little brother. It was advertised as a "gaming PC" and was really cheap. Unsurprisingly, it couldn't handle gaming whatsoever. The seller ghosted me when I tried to return it.
And thank goodness he did, because now it's the perfect machine for this! 😄
It lives in the basement, next to a spare bookshelf and synth organ. The tower sits on the carpet floor. A squat black rectangle, sticker residue on the side where a label was once peeled off. With the side panel removed, the fans pleasantly move the air around me while I'm tinkering and troubleshooting. A white $15 USB Wi-Fi adapter with a stubby antenna blinks green constantly.
This computer is terrible at being a desktop. If you try to even just move a window around, it stutters and lags. (I still have a ThinkPad X200T I bought for $40 that boots into Openbox and BunsenLabs and functions better as a desktop than this tower does) I'm pretty sure there's something wrong with the integrated graphics. But using it as a server you never look at? It works great! It's perfect. The limitation became the feature.
It did have a dedicated graphics card when I got it—a GT 700-something, one of those cards that's designed to look like a gaming GPU but is actually a low-end office card. I pulled it out and the connector pins looked possibly corroded, and I didn't investigate further.
The Gigabyte GA-78LMT-USB3 markets itself as being durable, shock-resistant and humidity-resistant. That's pretty funny—who is explicitly in the market for a durable motherboard? The answer is doomsday preppers and... homelabbers. The thing has survived being a failed gaming PC, six years of neglected basement storage, and a full server rebuild.
Before I set this up, I went salvaging for parts in one of the HP Elite Compaq 8200s my mom previously used for her remote job, and I was happily surprised to find a Samsung Evo 820 250GB SSD just sitting in it. Those little HPs are nifty machines, but they have a weird proprietary power supply that costs as much as the machine itself to replace.
What's Running
Here's everything currently live on brennan.cafe:
📁 Files — FileBrowser
A clean, web-based file manager for browsing and managing everything on the server. Think of it as a lightweight personal Google Drive UI. files.brennan.cafe
📦 Archive — ArchiveBox
Self-hosted internet archiving. Save web pages, bookmarks, videos, and full media captures before they disappear. The web is more ephemeral than anyone admits. archive.brennan.cafe
📊 Monitor — Beszel
Lightweight system monitoring — CPU, RAM, disk, network, all in a simple dashboard. Useful for actually knowing what your machine is doing. monitor.brennan.cafe
📈 Status — Uptime Kuma
Tracks uptime and response time for all my services. Sends me a notification if something goes down. Looks like a Better Uptime clone, except it's yours. status.brennan.cafe
📋 Logs — Dozzle
Real-time Docker log viewer. When something breaks at 2am, this is how you find out why. logs.brennan.cafe (password protected)
💾 Backup — Duplicati
Encrypted, scheduled backups to multiple cloud destinations (Backblaze B2, S3, SFTP, whatever you want). A backup solution you actually control. backup.brennan.cafe (password protected)
📖 Wiki — DokuWiki
Flat-file wiki — no database, just Markdown files on disk. I use it to document my own server: commands I keep forgetting, troubleshooting notes, configs. Write it down the first time. wiki.brennan.cafe
🚀 Deploy — Coolify
A self-hosted Heroku/Vercel alternative. Point it at a git repo, it handles deployment. More on this below. deploy.brennan.cafe
🦥 Social — GoToSocial
A lightweight ActivityPub server for the Fediverse. My own personal Mastodon instance, running on my own hardware. @brennan@brennan.cafe — social.brennan.cafe
📰 RSS — FreshRSS
Self-hosted RSS/Atom reader with a solid web interface and mobile app support. I read the web through FreshRSS instead of through algorithmic feeds. It uses SQLite by default, so no Postgres required. rss.brennan.cafe
✍️ Blog — Grav CMS
A modern flat-file CMS built on PHP. No database. Markdown content. A good middle ground between a static site generator and a full CMS if you want a GUI for writing. blog.brennan.cafe
And the Resource Usage?
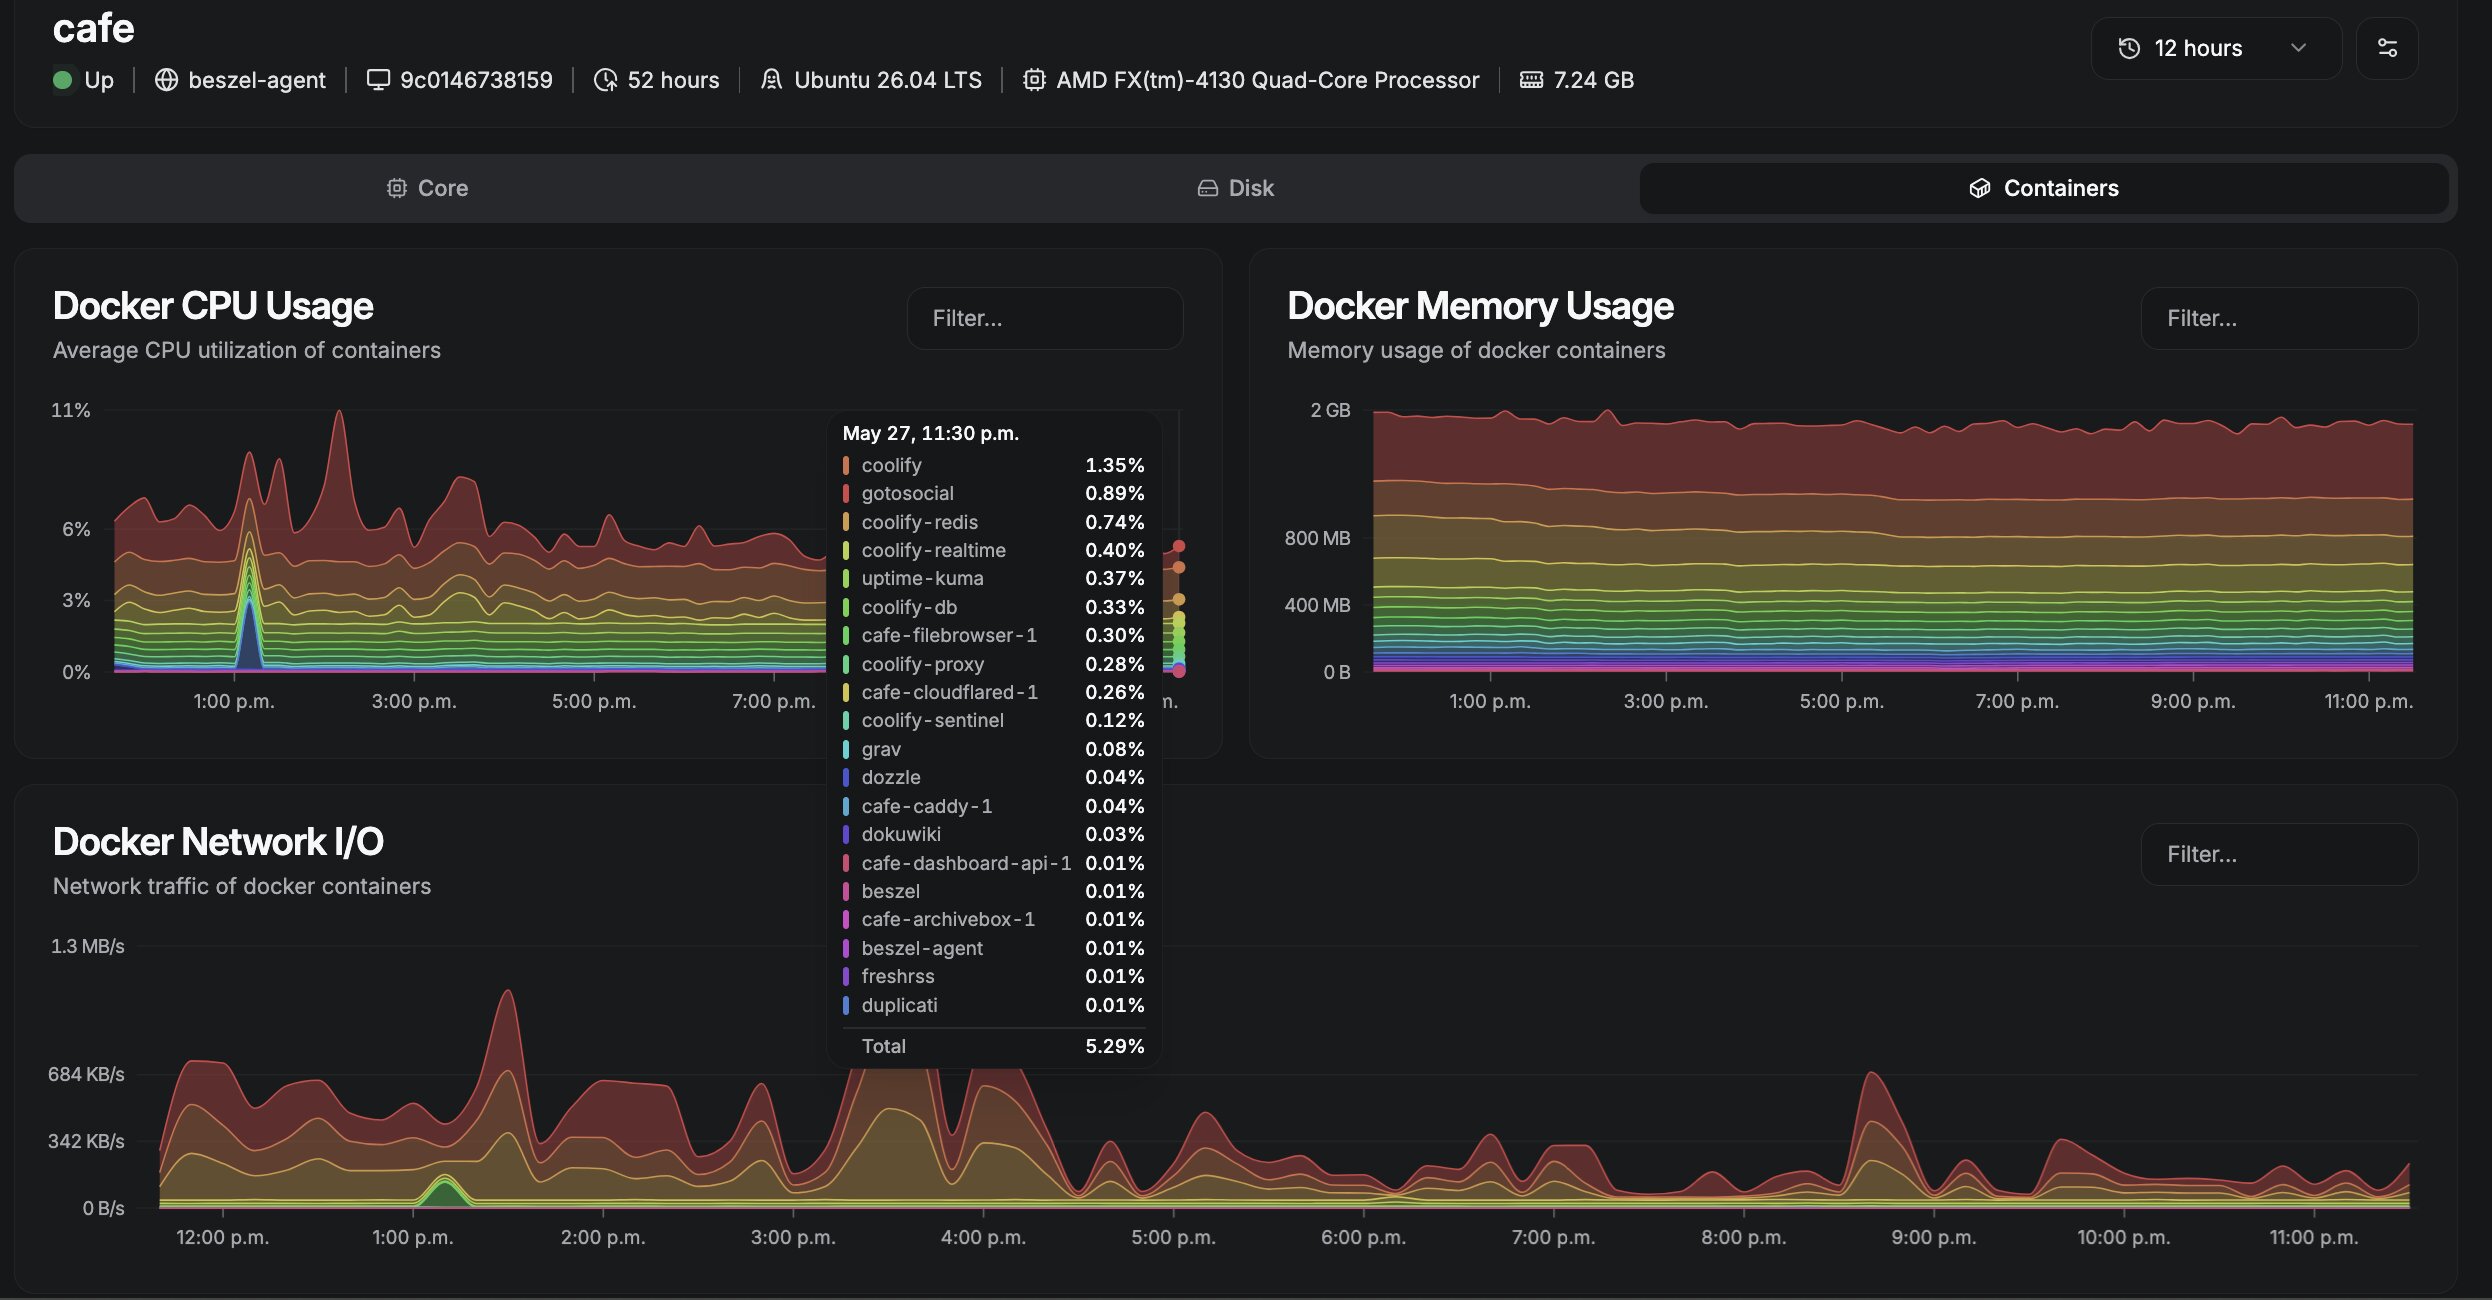
This machine is currently running eleven web services, using:
- 2 GB out of 8 GB RAM (25%)
- 30 GB storage
- ~20% CPU
That's a quad-core CPU from 2012, 8 gigabytes of DDR3 RAM, and a fast SSD. That's all my server requires, and you could run a homelab on even less.
Service Recommendations
Before you start deploying services, it's helpful to know what's realistic for your hardware. Here are the resource requirements for common self-hosted services:
| Service | RAM (Idle) | Storage | Priority | Notes |
|---|---|---|---|---|
| Vaultwarden | 10–30 MB | ~100 MB | 🔴 High | Password manager, Bitwarden-compatible |
| Beszel + Agent | ~35 MB | ~100 MB | 🔴 High | Server monitoring hub |
| Uptime Kuma | ~150 MB | ~200 MB | 🔴 High | Uptime/status monitoring |
| Dozzle | ~20 MB | ~0 MB | 🔴 High | Real-time Docker log viewer |
| Duplicati | ~50 MB idle | ~200 MB | 🔴 High | Encrypted backup solution |
| FreshRSS | ~50 MB | ~500 MB | 🟡 Medium | RSS/Atom feed reader |
| Miniflux | ~30–50 MB | ~500 MB | 🟡 Medium | Minimalist RSS reader (requires PostgreSQL) |
| Linkding | ~70 MB | ~200 MB | 🟡 Medium | Self-hosted bookmark manager |
| Shlink | ~120 MB | ~200 MB | 🟢 Low | URL shortener with analytics |
| Pi-hole | ~130 MB | ~500 MB | 🟢 Low | Network-wide ad blocker |
Note: These are idle/typical usage. RAM and storage will increase with actual usage (more feeds, more bookmarks, larger vaults, etc.).
On an 8 GB machine with the services listed above, you'd use roughly 655 MB of RAM and 2 GB of storage — leaving plenty of headroom for additional services.
Services to Avoid
Not every self-hosted service is suitable for older, modest hardware. Here are services that will overwhelm a machine like the one described in this guide:
| Service | Why |
|---|---|
| Jellyfin / Plex | Requires hardware video transcoding for smooth playback. Software transcoding on a 4-core CPU will peg the processor and affect all other services. |
| Elasticsearch | Requires 2+ GB RAM minimum. Designed for enterprise-scale search workloads. |
| ClickHouse | Column-store OLAP database designed for high RAM environments. |
| Nextcloud | Technically possible, but heavy on CPU for file processing, thumbnail generation, and previews. Can slow down the entire server. |
| GitLab | Requires 4+ GB RAM recommended. The self-hosted version is resource-intensive. |
| Matrix Synapse | The original Matrix server is very RAM-heavy. Consider a lighter alternative like Conduit if you need Matrix. |
Build up to these! Start with lightweight services and understand your machine's limits. Only tackle heavier workloads when you're ready to upgrade hardware or dedicate more resources.
THE GUIDE
Now, finally, we get into the actual how-to. This is not a single-sitting setup. Depending on how much of this you tackle, you're looking at a weekend project, maybe two. But each piece builds on the last, and once you have the foundation of OS, SSH, tunnel, and Docker, then everything else is running commands.
Step 1: Choosing Your OS
There are many different options for what operating system your server runs. Most guides will point you toward Ubuntu Server, and that's reasonable. It's lean, stable, well-documented, and has a massive community.
But Ubuntu Server is headless, which means there's no graphical interface at all. You get a black screen, a blinking cursor, and a login prompt. Everything is done through the terminal. That's fine if you're technical, and it does free up RAM and CPU that would otherwise go to running a desktop environment.
My personal recommendation for beginners, though, is Lubuntu. Here's why:
- It has a GUI when you need it. Sometimes you just want to drag a file somewhere, or open a browser to check something, or use a GUI text editor. Lubuntu's LXQt desktop is lightweight enough that it costs you almost nothing in resources while giving you this escape hatch.
- It behaves like Ubuntu underneath. Same package manager, same community documentation, same
apt installeverything. - It's forgiving. If you mess up your SSH config and lock yourself out, you can still physically sit down at the machine and fix it without needing a rescue USB.
Ubuntu Server uses around 200–300 MB less RAM, so keep that in mind. If you want to start with Ubuntu Server anyway, go for it. The rest of this guide works the same way.
Step 2: Using Micro
If you're not used to working in the terminal, I recommend you install Micro to start. This is the text editor you'll use for everything configuration-related on the server.
sudo apt install microMost Linux guides assume you use nano or vim. Nano is fine and Vim is powerful, but has a learning curve that is famously steep, the mere act of exiting is a meme. (The answer, by the way, is to press Esc, then type :q! and press Enter. :wq if you want to save first.)
Micro, on the other hand, has cursor support and uses familiar shortcuts. Ctrl+S to save, Ctrl+Q to quit, Ctrl+Z to undo. It feels like a GUI text editor.
Step 3: SSH Keys
Next, you'll need to get the local IP address of your server, run ip addr on the server itself for that. When you set up Ubuntu/Lubuntu, you'll provide a username. You put these together:
your-username@your-server-local-ip
For example, mine is brennan@192.168.1.66
SSH (Secure Shell) is then the backbone of everything that follows. It lets you connect to your server from any other machine, like your laptop in the living room, or in a coffee shop, anywhere really—and run commands as if you were sitting in front of the server.
Instead of logging in with a password (which is less secure and more annoying), we use a key pair: a private key that lives on your computer, and a public key that goes on the server. The server will only let in machines that have the matching private key.
There are detailed guides for this on ssh.com, but the short version:
# On your local machine (not the server)
ssh-keygen -t ed25519 -C "your-email@example.com"
This generates two files: ~/.ssh/id_ed25519 (your private key, NEVER share this) and ~/.ssh/id_ed25519.pub (your public key, this goes on the server and can be shared).
I also made a handy script for generating keys at once that I originally made for omg.lol. You can see all my public keys on my /keys page!
Next, copy your SSH key to your server:
ssh-copy-id -i ~/.ssh/id_ed25519.pub your-username@your-server-local-ipOnce your key is copied over, harden the SSH config:
sudo micro /etc/ssh/sshd_configSet these values:
PasswordAuthentication no
PubkeyAuthentication yes
PermitRootLogin no
Save, then restart SSH:
sudo systemctl restart sshdFrom this point forward, you can connect from your desktop computer to the server with the command:
ssh your-username@your-server-local-ipStep 4: Keep the Server Running Indefinitely
By default, a desktop like Lubuntu will put itself to sleep after a period of inactivity. Great for a desktop, bad for a server. Here's how to disable that:
# Disable systemd sleep targets
sudo systemctl mask sleep.target suspend.target hibernate.target hybrid-sleep.target

# Disable screen blanking (add to ~/.bash_profile or run at login)
xset s off
xset -dpms
xset s noblank
If you're using a laptop as your server, also disable lid-close sleep:
sudo micro /etc/systemd/logind.confSet:
HandleLidSwitch=ignore
HandleLidSwitchExternalPower=ignore
Then:
sudo systemctl restart systemd-logindTo prevent the display from turning off (optional, but nice if the machine has a monitor you occasionally glance at):
sudo micro /etc/X11/xorg.conf.d/10-noblank.confSection "ServerFlags"
Option "BlankTime" "0"
Option "StandbyTime" "0"
Option "SuspendTime" "0"
Option "OffTime" "0"
EndSection
If you're using WiFi for server connectivity (instead of Ethernet), the WiFi adapter may enter power-save mode and stop responding to connections. For me, this caused a confusing situation where your site is online but you can't SSH in.
Symptoms:
- Local SSH unreachable but Cloudflare Tunnel works
- ARP table shows "incomplete" for server IP
ip linkshows WiFi interface in DORMANT state
Disable WiFi Power Save:
# Find your WiFi interface name
ip link show
# Look for something like wlxbc071d481e84 or wlan0

# Disable power save immediately (replace with your interface name)
sudo iw dev YOUR_INTERFACE set power_save off

# Verify it's disabled
sudo iw YOUR_INTERFACE get power_save
# Should show: Power save: off
Make it persistent across reboots:
# Create a systemd service
sudo tee /etc/systemd/system/wifi-powersave-off.service > /dev/null << 'EOF'
[Unit]
Description=Disable WiFi power save
After=network.target

[Service]
Type=oneshot
ExecStart=/usr/sbin/iw dev YOUR_INTERFACE set power_save off

[Install]
WantedBy=multi-user.target
EOF

# Enable and start the service
sudo systemctl enable wifi-powersave-off.service
sudo systemctl start wifi-powersave-off.service
Replace YOUR_INTERFACE with your actual WiFi interface name from ip link show.
Alternative: NetworkManager configuration
sudo tee /etc/NetworkManager/conf.d/wifi-powersave.conf > /dev/null << 'EOF'
[connection]
wifi.powersave = 2
EOF

sudo systemctl restart NetworkManager
Note: If possible, use Ethernet instead of WiFi for your server. Ethernet is more reliable, has lower latency, and doesn't have power management issues.
Step 5: Port Forwarding vs. Cloudflare Tunnel
This is the moment where most beginner guides gloss over an important decision: You have a server running on your home network, but how does the outside world reach it? There are two main approaches:
Option A: Port Forwarding
Your home router sits between the internet and your devices. By default, it blocks all incoming connections from the outside. Port forwarding punches a specific hole in that wall: "if someone requests port 80 (HTTP) or 443 (HTTPS), send them to this machine."
You configure this in your router's admin interface (usually at 192.168.1.1 or 192.168.0.1). The process varies by router, but you're looking for "Port Forwarding" or "Virtual Servers" in the settings.
Pros:
- No third party involved
- Fully direct connection, lowest latency
- No dependency on Cloudflare's uptime
Cons:
- Your home IP address is publicly visible
- If your ISP gives you a dynamic IP (which most residential ISPs do), your address changes periodically — you need a Dynamic DNS (DDNS) service like DuckDNS to keep a stable domain pointing at it
- Some ISPs block incoming connections on port 80/443 on residential plans
- You are directly exposing your home network to the internet — if your server has a vulnerability, it's reachable
Option B: Cloudflare Tunnel
Now, I've criticised Cloudflare in the past, and the problems with their leadership is something to keep in mind.
With that said, Cloudflare Tunnel (formerly Argo Tunnel) works differently from port forwarding. Instead of opening your router, a small daemon called cloudflared runs on your server and reaches out to Cloudflare's network, establishing a persistent encrypted connection. Cloudflare then proxies requests through that tunnel to your server.
Your home IP is never exposed. You don't touch your router. It works even if your ISP blocks port 80/443. It works behind CGNAT (the thing some ISPs do where multiple households share a single IP address, making traditional port forwarding impossible).
Pros:
- No router configuration
- Home IP stays private
- Works with CGNAT and restrictive ISPs
- Free tier is generous for personal use
- SSL certificates are handled automatically
Cons:
- Cloudflare sits between you and your visitors (they see your traffic)
- Dependency on Cloudflare's infrastructure
- Against Cloudflare's ToS to serve large media files through a tunnel
My recommendation for beginners: start with Cloudflare Tunnel. It's more forgiving, requires less networking knowledge, and you can always switch to port forwarding later. The privacy tradeoff is there, but for a personal homelab, I think it's reasonable.
Here's how you set up Cloudflare tunnel:
- Create a free account at cloudflare.com and add your domain
- Install
cloudflared:
# Add Cloudflare's apt repo
curl -L --output cloudflared.deb https://github.com/cloudflare/cloudflared/releases/latest/download/cloudflared-linux-amd64.deb
sudo dpkg -i cloudflared.deb- Authenticate and create a tunnel:
cloudflared tunnel login
cloudflared tunnel create my-homelab- Configure your tunnel in
~/.cloudflared/config.yml:
tunnel: YOUR-TUNNEL-ID
credentials-file: /home/youruser/.cloudflared/YOUR-TUNNEL-ID.json

ingress:
  - hostname: files.yourdomain.com
    service: http://localhost:8080
  - hostname: blog.yourdomain.com
    service: http://localhost:2368
- service: http_status:404- Route DNS and start the tunnel:
cloudflared tunnel route dns my-homelab files.yourdomain.com
sudo cloudflared service install
sudo systemctl start cloudflared
Step 6: Docker and Caddy
Docker is what makes running a dozen services on one machine practical. Instead of installing each piece of software directly on your OS (where they'd fight over dependencies and configurations), Docker packages each service in its own isolated container. Each container has everything it needs. They run side by side without interfering with each other. When you want to remove a service, you remove the container. The host machine stays clean.
Install Docker:
curl -fsSL https://get.docker.com -o get-docker.sh
sudo sh get-docker.sh
sudo usermod -aG docker $USER
Log out and back in. Now you can run Docker commands without sudo.
Caddy is a web server and reverse proxy. A reverse proxy sits in front of all your services and routes incoming requests to the right container. When someone visits files.brennan.cafe, Caddy looks at the domain name and forwards the request to whatever container is serving FileBrowser on port 8080.
Caddy's killer feature is automatic HTTPS: it provisions and renews SSL certificates from Let's Encrypt automatically, with zero configuration. You don't think about it. It just works.
A Caddyfile looks like this:
files.yourdomain.com {
    reverse_proxy localhost:8080
}

wiki.yourdomain.com {
    reverse_proxy localhost:8090
}
Install Caddy:
sudo apt install -y debian-keyring debian-archive-keyring apt-transport-https
curl -1sLf 'https://dl.cloudsmith.io/public/caddy/stable/gpg.key' | sudo gpg --dearmor -o /usr/share/keyrings/caddy-stable-archive-keyring.gpg
curl -1sLf 'https://dl.cloudsmith.io/public/caddy/stable/debian.deb.txt' | sudo tee /etc/apt/sources.list.d/caddy-stable.list
sudo apt update
sudo apt install caddy
Edit /etc/caddy/Caddyfile with your subdomains and service ports, then:
sudo systemctl reload caddyStep 7: Setting Up Monitoring
Before you deploy a bunch of services, set up monitoring so you can actually see what's happening on your server. You can't manage what you can't measure. This is also a great way to understand how Docker works.
Beszel: Internal server monitoring (CPU, RAM, disk, network, per-container stats)
Install Beszel with Docker:
docker run -d \
  --name beszel \
  --restart unless-stopped \
  -p 3000:3000 \
  -v /beszel_data:/beszel_data \
  henrygd/beszel:latest # This is the entire service!
Access the dashboard at http://your-server-ip:3000 and follow the setup wizard to add your server as an agent.
Uptime Kuma: External uptime monitoring (checks if services are up from the outside)
Install Uptime Kuma with Docker:
docker run -d \
  --name uptime-kuma \
  --restart unless-stopped \
  -p 3001:3001 \
  -v uptime-kuma:/app/data \
  louislam/uptime-kuma:1
Access at http://your-server-ip:3001 and add monitors for your services.
Dozzle: Real-time Docker log viewer
Install Dozzle with Docker:
docker run -d \
  --name dozzle \
  --restart unless-stopped \
  -p 8080:8080 \
  -v /var/run/docker.sock:/var/run/docker.sock \
  amir20/dozzle:latest
Access at http://your-server-ip:8080 to view logs from all your containers in real-time.
Step 8: Setting Up Backups
Before you add more services, set up a backup strategy. Duplicati is a solid choice, as it supports multiple destinations (Backblaze B2, S3, SFTP, Google Drive, OneDrive) and handles encryption, scheduling, and deduplication automatically.
Install Duplicati with Docker:
docker run -d \
  --name duplicati \
  --restart unless-stopped \
  -p 8200:8200 \
  -v duplicati_config:/data \
  -v /home/brennan:/source \
  duplicati/duplicati:latest
Access at http://your-server-ip:8200 and configure:
- Add a backup destination (Backblaze B2 is affordable and reliable)
- Select the directories to back up (
/home/brennan/cafe,/data/coolify, Docker volumes) - Set a schedule (daily at 3 AM is reasonable)
- Enable encryption with a strong passphrase
Important: Test your backup by performing a restore. A backup you can't restore is not a backup.
Step 9: Deploying Services with Coolify
Coolify is, as the name implies, really cool. It's a self-hosted alternative to Heroku, Netlify, or Vercel. A web dashboard where you connect a git repository, configure environment variables, and click Deploy. It handles the Docker build, the container orchestration, the reverse proxy config, and the SSL certificate.
For beginners who don't yet want to write docker-compose.yml files by hand, Coolify is a great on-ramp. It comes with one-click installers for Nextcloud, Ghost, WordPress, n8n, Gitea, Plausible Analytics, and dozens of other services.
Install Coolify with one command:
curl -fsSL https://cdn.coollabs.io/coolify/install.sh | bashThen access the dashboard at http://your-server-ip:8000 and follow the setup wizard. You'll configure your domain, set up SSH key access to the server (Coolify uses this to manage containers), and you're off.
A note on resource use: Coolify itself is more resource-intensive than running containers manually, I've found it uses 300–500 MB of RAM at rest. On an 8 GB machine, that's fine. On a 4 GB machine, you might prefer managing Docker Compose files directly.
Deployment Order
If you're following this guide from start to finish, here's a recommended order for deploying services. This builds incrementally and gives you useful tools early:
- Dozzle: Fastest to deploy, immediately useful for debugging
- Beszel + Agent: Get visibility into your server ASAP
- Uptime Kuma: Monitor all your existing services
- Duplicati: Set up backups before you add more services
- Vaultwarden: Move passwords off commercial providers
- Coolify: Set up your deployment platform
- FreshRSS or Miniflux: Needs PostgreSQL if using Miniflux
- Linkding: Quick single-container deploy
- Shlink: Quick single-container deploy
- Pi-hole: Requires network-level DNS config change on your router
Step 10: Good Ol' Fashion Blogging
Hugo is a fantastic option for a homelab blog. Generates a static site from plain Markdown files. There's no database, no PHP, no runtime. Just a folder of .md files turned into folder of .html files.
I specifically created the bash tool writer-cli for this use-case! I also created the Hugo blog theme IndiePaper for people that want a template that has full IndieWeb functionality built-in. The workflow is:
- Write a post in Markdown with my
writer-cliscript - Hugo rebuilds the site (takes about 200ms for a large site)
- Caddy serves the static output
To run Hugo in Docker:
FROM klakegg/hugo:ext-alpine AS builder
COPY . /src
WORKDIR /src
RUN hugo --minify
FROM caddy:alpine
COPY /src/public /usr/share/caddyOr just install Hugo directly:
# Download the latest release
wget https://github.com/gohugoio/hugo/releases/download/v0.128.0/hugo_extended_0.128.0_linux-amd64.deb
sudo dpkg -i hugo_extended_0.128.0_linux-amd64.deb
And serve the site:
hugo server --bind 0.0.0.0 --baseURL https://blog.yourdomain.comStep 11: The Wiki (Document As You Go)
A great project to have on your homelab is a wiki for the homelab itself. The more you work on it, the more you'll learn. It's a virtuous cycle! Document everything and keep notes as you go.
DokuWiki is my choice because it's flat-file (no database), and the search works great. But Wiki.js, or even a plain Obsidian vault synced to your server would work fine.
What goes in the wiki:
- Every command you run that you had to look up
- Every config file you edited and what you changed
- Every error you encountered and how you fixed it
- Port assignments for all your services (so you don't accidentally give two things the same port)
- Your Docker Compose files, in full
- Notes on what broke and why
Six months from now, when something stops working and you can't remember how you set it up, you'll thank yourself.
Step 12: Security Beyond SSH
SSH hardening is a good start, but there are a few more security basics worth implementing.
UFW (Uncomplicated Firewall): A simple firewall management tool
sudo apt install ufw
sudo ufw default deny incoming
sudo ufw default allow outgoing
sudo ufw allow ssh
sudo ufw allow 80/tcp
sudo ufw allow 443/tcp
sudo ufw enable
This blocks all incoming traffic except SSH, HTTP, and HTTPS — which is all you need for a web server.
Fail2ban: Ban brute-force attackers
sudo apt install fail2ban
sudo systemctl enable fail2ban
sudo systemctl start fail2ban
Fail2ban monitors log files and bans IPs that show malicious signs (too many failed SSH login attempts, etc.).
Automatic Security Updates
sudo apt install unattended-upgrades
sudo dpkg-reconfigure -plow unattended-upgrades
This will automatically install security updates on your system, reducing the window of vulnerability.
Appendix: Power Consumption and Cost
Running a server 24/7 has an ongoing cost in electricity. The AMD FX-4130 in my own tower has a 125W TDP (Thermal Design Power). In practice, at idle with light services running, it draws about 40–60 watts from the wall. Under load, it might spike to 80–100 watts.
Monthly cost calculation:
- Average draw: 50 watts
- Hours per day: 24
- Days per month: 30
- Total kWh: 50W × 24h × 30d ÷ 1000 = 36 kWh
- Cost at $0.12/kWh: 36 × $0.12 = $4.32/month
So you're looking at roughly $4–$6 per month in electricity costs for a machine like this. That's not nothing, but it's significantly less than the monthly cost of cloud services.
If you're concerned about power use, consider:
- Using a more efficient CPU (Intel NUC, Raspberry Pi, or modern low-power desktop)
- Aggressively power-managing the machine (CPU frequency scaling, aggressive sleep settings on unused services)
- Running the server on a schedule (only on when you need it)
A Final Note
Wow, that was a lot of steps! Let me tell you, like anything related to programming, you will have bugs. You will have errors. You will be searching and trying to find solutions, and sometimes things will stay broken for a long time.
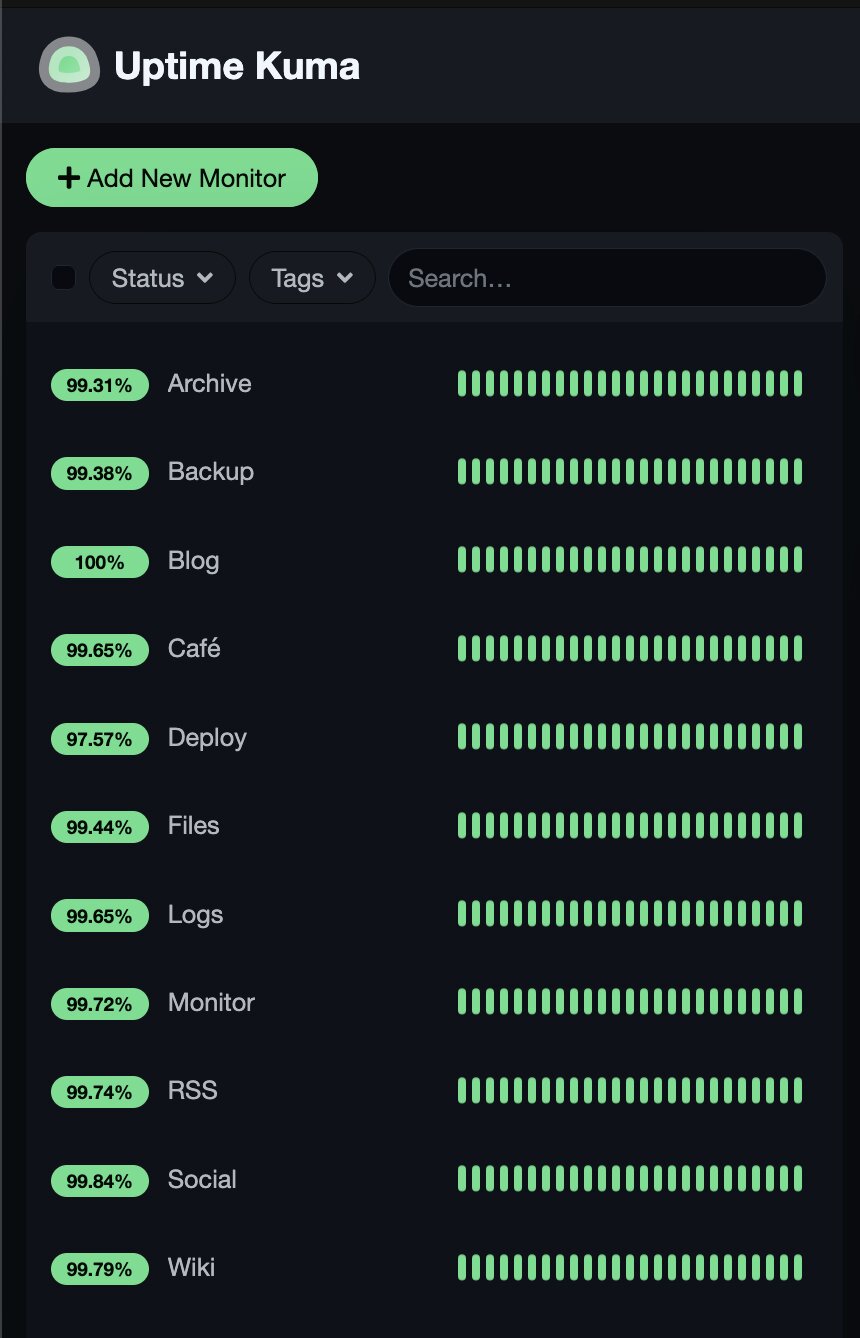
Because I've primarily been a front-end webdev for over a decade, I've always run into trouble with devOps. But I just kept returning, I kept figuring out better practices. Better fundamentals. And now my homelab has better uptimes than GitHub:
This isn't about the easiest, fastest solution. This isn't about splurging on powerful hardware to replace your entire digital life. Start where you are. Use what you have. Do what you can.
This is about envisioning a web that's affordable, accessible, and focused on learning. My God, how are we supposed to learn anything if everything works the first time or we offload troubleshooting to someone else? (or worse, an error-prone genAI bot?)
Homelabbing is a reclamation project. To reclaim the understanding of what the Internet is, and how we can create and build it ourselves.









Comments
To comment, please sign in with your website:
How it works: Enter your website URL. IndieLogin signs you in through your site's IndieAuth server if it has one (e.g. indieauth.com), or checks your rel="me" links on GitHub, GitLab, Codeberg, and email. Setup instructions.
Signed in as: