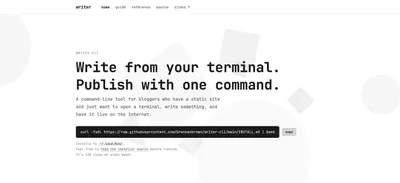
Screenshot of the documentation website, writer.brennan.day, taken by the author.
issue #192 of brennan.day
Introducing writer-cli: a bash tool I built from scratch to blog in the terminal!

brennan.day — issue #192
Publisher: Brennan Kenneth Brown
Place of publication: Calgary, Alberta, Canada
Available at: https://brennan.day
Contact: mail@brennanbrown.ca
When I first began exploring the IndieWeb several months ago, I stumbled upon the tildeverse, which describes itself as "a loose association of like-minded tilde communities" for those "interested in learning about nix (linux, unix, bsd, etc)."
It's important I tell you about these communities, because Wikipedia deleted the article on it, justifying the decision by saying there was "no coverage available in reliable sources, provided sources are non-independent".
A "tilde community" is, essentially, a shared, public-access computer. And you know how much I love public access, right? The name comes from the Unix shorthand symbol (~), denoting a user's home directory (e.g., server.org/~username), because these communities exist on Unix/Linux servers (often called a "pubnix") run with love by hobbyists.
The Heartbreak of Copy Fail
Sadly, right now, many tilde communities are shut down due to the CopyFail and Dirty Frag vulnerabilities.
Copy Fail is a local privilege escalation flaw in the Linux kernel's algif_aead cryptographic module. It chains the AF_ALG crypto API socket interface with the `splice()`` system call to perform a 4-byte write to the page cache, allowing an unprivileged local user to escalate their privileges to full root access.
The exploit requires only local authenticated access, and that access can come from compromised SSH credentials, an exposed service, or a malicious container image.
Tilde servers are explicitly multi-user SSH environments where untrusted strangers have shell accounts. That's the whole model, and so Copy Fail turns any local user account into a path to root, which means a tilde admin's only real option is to take the server offline right now.
So, regrettably, my essay on the tildeverse is put on hold until these vulnerabilities can be properly patched and the communities return.
The Feels Engine
But in the meantime, I made my own terminal-based tool for writing. You see, one of my favourite programs of the tildeverse is the TTBP, short for the tilde.town feels engine. It is a blogging tool that allows you to easily write an entry, publish it to the web, and browse other entries by other users of the tilde community.
I thought about the steps required to make a blog post on my own server: You need to SSH into the server, navigate to the right folder, manually create a file with the right frontmatter (YAML or TOML), remember the exact date format your SSG wants, open an editor, write, save, run the build, check for errors. Then, if you use git, you need to run git add, git commit (with proper message hygiene), git push.
So I built writer-cli, inspired by the feels engine. A command-line tool for bloggers who just want to open a terminal, write something, and have it live on the Internet. It's a single bash command:
writer my-post-slugThat's it, everything else is prompts and automation.
This post is a technical walkthrough of how it works, the design decisions made, and what I'd do differently.
I'd like to give a shoutout to Cris! He gave me really helpful pointers and sent me the Google Shell Style Guide, which taught me a lot and influenced a lot of the code of this project.
Now, this seems like such a simple concept, right? But in wanting to do a good job, the codebase is now around 1,800 lines in total.
I can't really tell you exactly why I always treat these little software projects I do as sprints. I've been wanting to make a project like this forever but I only began planning it a week ago. And then regarding the actual coding part, I've been up doing ten-hour daily coding sessions for the past three days during this self-imposed hackathon at this point.
Honestly? I think I'm actually lazy and I don't want to continually work on projects with maintence. :^)
What writer-cli Does
The premise of my little tool is simple, I wanted to wrap the full lifecycle of a Hugo (or Eleventy, or Jekyll) blog post into one shell command. When you run writer my-slug, the following happens:
- You're asked for a title and optional tags
- Your editor opens with the cursor below the frontmatter, ready to write
- You close the editor, optionally add a one-line description
- You confirm, and writer builds the site and pushes to git
And, voilà, the post is live! The tool takes care of everything else.
Why Bash?
Because bash is always there! The intended use case is a remote server over SSH. You can post from anywhere you can open a terminal: your laptop, a library computer, even your phone if you're tech-savvy enough.
My philosophy is that you should not be required to have dependencies installed just to publish a blog post, such as Python, Node, etc. But bash has been on every Linux server before I was born, and will continue to be there long after every JavaScript framework in my node_modules folder has been deprecated.
I wanted to make a blogging tool that, itself was just a text file. There's no binaries, build steps, or compilation. You can read every line from source.
Of course, there is trade-off. bash 4 had a GPL license change, and so macOS ships with the outdated bash 3.2. This means no associative arrays, no ${var,,} lowercase operator, no mapfile.
Obviously, having that functionality would have been nice, and I needed to find workarounds:
# What I wanted to write:
slug="${input,,}"

# What I had to write instead (bash 3.2 compatible):
slug="$(printf '%s' "$input" | tr '[:upper:]' '[:lower:]')"
It's more verbose and clunky, but it works on every machine.
Modular Architecture
You'd think a script for something like this would be tiny, but as I accounted for edge cases and different static-site generators, the single writer.sh script became 700 lines.
It worked, but I decided to modularize the way I did for my site's 11ty config a week ago:
lib/
├── defaults.sh      ← global variables and output helpers
├── config.sh        ← INI config file parser
├── args.sh          ← CLI flag parsing
├── setup.sh         ← interactive setup wizard
├── validate.sh      ← slug validation, ISO 8601 dates
├── frontmatter.sh   ← YAML and TOML builders
├── deps.sh          ← dependency pre-flight checks
└── post.sh          ← main workflow orchestration
The entry point writer.sh is now only 30 lines, it resolves its own directory (so symlinks work), sources all eight modules in order, and calls main "$@".
_writer_source="${BASH_SOURCE[0]}"
while [[ -L "$_writer_source" ]]; do
    _writer_dir="$(cd "$(dirname "$_writer_source")" && pwd)"
    _writer_source="$(readlink "$_writer_source")"
    [[ "$_writer_source" != /* ]] && _writer_source="${_writer_dir}/${_writer_source}"
done
WRITER_DIR="$(cd "$(dirname "$_writer_source")" && pwd)"

source "${WRITER_DIR}/lib/defaults.sh"
source "${WRITER_DIR}/lib/config.sh"
# ... and so on
main "$@"
Using ${BASH_SOURCE[0]} rather than $0 is important, $0 can be rewritten by the shell, while ${BASH_SOURCE[0]} always points to the file being sourced or executed. The while loop then follows any chain of symlinks to the real file, handling the case where BSD readlink returns relative paths (unlike GNU readlink -f).
All modules are sourced into the same shell, not run as subshells. This means they share global state without needing export everywhere. It also means each lib file has no shebang and doesn't set its own set -e and instead inherits the caller's environment.
Config Layering
One thing I wanted from the start was a sane configuration system. Writer has ten configurable settings: your SSG, build command, content directory, editor, timezone, etc. and I wanted them to be overridable at multiple levels without confusion.
The loading order is:
- Hardcoded defaults (in
lib/defaults.sh) - Global config (
~/.config/writer/config) cdtoSITE_DIRif set- Project-local
.writerrc - CLI flags — highest priority
load_global_config        # reads ~/.config/writer/config
if [[ -n "$SITE_DIR" ]]; then
    cd "$SITE_DIR"
fi
load_local_config         # reads .writerrc in current directory
# then CLI flag overrides are applied
The config format is plain INI. KEY=value, one per line, # for comments. I wrote a small parser for it to continue not using an external library:
_parse_config_file() {
    local config_file="$1"
    local line key value
    while IFS= read -r line || [[ -n "$line" ]]; do
        line="${line%%#*}"           # strip inline comments
        line="${line#"${line%%[![:space:]]*}"}"  # trim leading whitespace
        line="${line%"${line##*[![:space:]]}"}"  # trim trailing whitespace
        if [[ -z "$line" ]]; then continue; fi

        key="${line%%=*}"
        value="${line#*=}"
        # ... trim whitespace from each, then assign to global

        case "$key" in
            SSG)          SSG="$value" ;;
            BUILD_CMD)    BUILD_CMD="$value" ;;
            # ... etc
            *)
                err "Unknown config key: '$key'"
                exit 5
                ;;
        esac
    done < "$config_file"
}
The || [[ -n "$line" ]] on the while read is important, the last line of a file is silently dropped if it doesn't end with a newline, a common mistake in hand-edited config files.
Unknown keys exit with code 5 and print all valid keys. It's strict to ensure typos aren't silently ignored.
Frontmatter Generation
Both YAML and TOML are supported, and the frontmatter needs to be generated twice: once before the editor opens (without a description, because you haven't written the post yet) and once after (optionally inserting a description you provide post-edit).
For YAML:
build_yaml_frontmatter() {
    local title="$1" slug="$2" date="$3"
    local tags="$4" description="$5" draft="$6"

    local fm="---\n"
    fm+="title: \"${title}\"\n"
    fm+="date: ${date}\n"
    fm+="slug: \"${slug}\"\n"

    if [[ -n "$tags" ]]; then
        fm+="tags:\n"
        IFS=',' read -ra tag_array <<< "$tags"
        for tag in "${tag_array[@]}"; do
            # trim whitespace from each tag
            tag="${tag#"${tag%%[![:space:]]*}"}"
            tag="${tag%"${tag##*[![:space:]]}"}"
            if [[ -z "$tag" ]]; then continue; fi
            fm+="  - ${tag}\n"
        done
    fi

    if [[ -n "$description" ]]; then
        fm+="description: \"${description}\"\n"
    fi

    fm+="draft: ${draft}\n---\n"
    printf "%b" "$fm"
}
I needed to trim the tags, because if a user types life, coffee , writing the commas split into life, coffee, writing. The whitespace needs to be stripped from each element. Bash doesn't have a trim function, so I use parameter expansion: ${var#"${var%%[![:space:]]*}"} strips leading whitespace by removing the longest prefix that consists only of spaces, and ${var%"${var##*[![:space:]]}"}" does the same for trailing. It's a little ugly, but it works without spawning a subshell.
After the editor closes, if the user provides a description, the tool only needs to rewrite only the frontmatter section of the already-written file, preserving the post body. The closing deliminter is found (--- for YAML, +++ for TOML) and tail is used to extract the body:
local delim_count=0
local body_start=0
local lineno=0
while IFS= read -r line; do
    lineno=$(( lineno + 1 ))
    if [[ "$line" == "$delimiter" ]]; then
        delim_count=$(( delim_count + 1 ))
        if [[ $delim_count -eq 2 ]]; then
            body_start=$lineno
            break
        fi
    fi
done < "$file_path"

body="$(tail -n +"$((body_start + 1))" "$file_path")"
printf "%s\n" "$frontmatter" > "$file_path"
if [[ -n "$body" ]]; then
    printf "%s\n" "$body" >> "$file_path"
fi
The Date Problem
Getting a timezone-aware ISO 8601 date string in bash is annoying. GNU date (Linux) and BSD date (macOS) have completely different flag syntax:
# GNU date (Linux):
date --iso-8601=seconds
# Output: 2026-05-23T12:00:00-06:00

# BSD date (macOS):
date +"%Y-%m-%dT%H:%M:%S%z"
# Output: 2026-05-23T12:00:00-0600  ← missing colon in offset
Hugo, for example, requires the colon. So get_iso_date() tries GNU date first, and if that fails, falls back to BSD date with a sed pass to insert the colon:
printf '%s' "$result" | sed 's/\([+-][0-9]\{2\}\)\([0-9]\{2\}\)$/\1:\2/'For timezones, I wanted to avoid the error-prone approach of manually computing offsets, so the tool uses a plain string variable and a conditional TZ= prefix:
local custom_tz=""
if [[ "$TIMEZONE" != "auto" && -n "$TIMEZONE" ]]; then
    custom_tz="$TIMEZONE"
fi

if [[ -n "$custom_tz" ]]; then
    TZ="$custom_tz" date --iso-8601=seconds 2>/dev/null
else
    date --iso-8601=seconds 2>/dev/null
fi
An earlier version used a bash array (local -a tz_prefix=()) to build an optional env TZ=... prefix, which looked cleaner. But under set -u in bash 3.2, expanding an empty array with ${tz_prefix[@]} throws unbound variable, a well-known bash 3.2 gotcha that surfaces when the array is empty. Once again, the conditional string approach is more clunky but works correctly everywhere.
The Setup Wizard
I wanted first-run setup to be completely non-frightening for less technical users. Running writer with no config fires an interactive wizard. There are prompts, and each shows the current default in green so you can just press Enter through everything.
_prompt() {
    local key="$1" description="$2" current="$3"
    printf "\n${CYAN}%s${RESET}\n" "$key"
    printf "  %s\n" "$description"
    printf "  Current: ${GREEN}%s${RESET}\n" "$current"
    printf "  Press Enter to keep, or type a new value: "
    read -r REPLY_VAL </dev/tty || true
    REPLY_VAL="${REPLY_VAL#"${REPLY_VAL%%[![:space:]]*}"}"
    REPLY_VAL="${REPLY_VAL%"${REPLY_VAL##*[![:space:]]}"}"
    if [[ -z "$REPLY_VAL" ]]; then REPLY_VAL="$current"; fi
}
The </dev/tty redirect is needed when the installer is run via curl | bash, because stdin is the pipe carrying the script itself. Without redirecting reads to /dev/tty, read would consume lines of the script as user input, silently corrupting the saved config. The whitespace trimming strips spaces a user might accidentally type before pressing Enter.
The result is saved to ~/.config/writer/config with a date-stamped comment header. It can be re-run anytime with writer --setup and every value is shown with whatever you set last time.
The Test Suite
Test-driven development is smart, right? So I created a test suite to ensure all edge-cases are caught and errors are handled gracefully and give verbose output so we can understand what's going wrong, and why.
bash tests/test_writer.shThe harness is split into a thin runner (tests/test_writer.sh) that sources six focused modules from tests/lib/, mirroring the same structure as the main lib/. The runner creates an isolated $HOME via mktemp -d for every test so the real config is never touched. All tests use --dry-run or temp directories, there's no real editor, build, or git operations ever run. It exits non-zero if anything fails, so it can be used in CI.
Right now? All the tests I've created are passing, yay!
What I'd Do Differently
The eval for BUILD_CMD: Originally I used eval "$BUILD_CMD" to run the user's build command. This is discouraged by the Google Shell Style Guide because eval on user-controlled strings is a correctness and security risk. I've replaced it with bash -c "$BUILD_CMD", which still handles multi-word commands like hugo --minify correctly but is safer.
Test coverage of the full flow: While the test suite has many assertions covering every function: all flag combinations, frontmatter formats, and config parsing, etc. The actual editor-open-save-close flow is not automatically tested because it needs an interactive terminal. I did a lot of manual testing myself on four different machines (I'm the kind of computer nerds that collects ThinkPads like they're candy) and I hope that was robust enough to catch issues.
Install and Give It a Try!
I wanted to make things as simple as possible, and so the command below takes care of everything, you just copy-paste it into your terminal.
curl -fsSL https://raw.githubusercontent.com/brennanbrown/writer-cli/main/INSTALL.sh | bashAfter the installer finishes, reload your shell profile so the new ~/.local/bin/ PATH entry takes effect and writer is available as a command:
source ~/.bashrc # or ~/.zshrc if you're using Zsh, etc.Then run writer --setup to configure your site directory, SSG, and editor.
NOTE: Now, of course you shouldn't blindly copy-paste commands from the Internet into your terminal, so only do that if you trust me! You can visit that URL and the repo and read everything that goes into the scripts I've made. Again, there's no building or compiling or dependencies, so WYSIWYG!
The installer clones the repo to ~/.local/share/writer-cli, symlinks writer to ~/.local/bin/, and adds that to your PATH if needed. Everything in your home directory, nothing system-wide.
To uninstall: rm -rf ~/.local/share/writer-cli ~/.local/bin/writer.
Read the docs site for the full guide, including the SSH remote workflow and .writerrc project-local config.
If you do try it out, and you find a bug (which I'm sure you will), please open an issue or submit a pull request! All tests should pass before submitting (unless you find bugs in the test suite, then God help me). Run shellcheck writer.sh lib/*.sh tests/lib/*.sh to lint your changes.
Have questions, feedback, or your own CLI workflow tips? Drop a comment below or email me, I'd love to hear how you're using writer-cli or what features you'd like to see added!
BONUS: Making a Homebrew Tap
After getting the curl installer working, I realized I wanted more options for installing. Anybody in security will tell you the curl | bash pattern is a security anti-pattern.
I added support for Basher, a lightweight package manager for shell scripts. Where Homebrew is a full package manager that handles binaries and dependencies, Basher is much simpler: it clones a GitHub repo and links the main script into your PATH. All it needs is a package.sh manifest in the repo declaring the entry point:
BASHER_PACKAGE_NAME=writer
BASHER_MAIN=writer.sh
Then anyone with Basher can install writer with:
basher install brennanbrown/writer-cliI also then decided to make a Homebrew tap to support brew install, as that's the first thing a lot of macOS users reach for, though it's a little more complicated.
Homebrew supports third-party "taps", which are just GitHub repos named homebrew-<something> that contain a Formula/ directory.
So I created brennanbrown/homebrew-writer. The repo is one file:
homebrew-writer/
└── Formula/
    └── writer.rb
The formula itself is Ruby:
class Writer < Formula
  desc "CLI post creation tool for static site generator blogs"
  homepage "https://github.com/brennanbrown/writer-cli"
  url "https://github.com/brennanbrown/writer-cli/archive/refs/tags/v1.1.2.tar.gz"
  sha256 "845e16dbf3c438196754d9a6956db265e5f371b5eb061531ca9b54670f2a5096"
  license "AGPL-3.0-only"

  depends_on "bash"
  depends_on "git"

  def install
    libexec.install "writer.sh", "lib"
    bin.install_symlink libexec/"writer.sh" => "writer"
  end

  def caveats
    <<~EOS
      Run the setup wizard before first use:
        writer --setup
    EOS
  end

  test do
    assert_match "Usage:", shell_output("#{bin}/writer --help")
  end
end
The symlink-resolution loop in writer.sh needs to handle relative paths. When Homebrew creates bin/writer → ../libexec/writer.sh, BSD readlink returns that relative path as-is, not an absolute one. The loop resolves it against the symlink's own directory:
[[ "$_writer_source" != /* ]] && _writer_source="${_writer_dir}/${_writer_source}"Without that line, cd "$(dirname relative/path)" would resolve relative to whatever directory the user happened to be in when they ran writer.
Once the tap is in place, installing is:
brew tap brennanbrown/writer
brew install writer
And updating is just brew upgrade writer, so you don't need to manually pull from the git repository.


Comments
To comment, please sign in with your website:
How it works: Enter your website URL. IndieLogin signs you in through your site's IndieAuth server if it has one (e.g. indieauth.com), or checks your rel="me" links on GitHub, GitLab, Codeberg, and email. Setup instructions.
Signed in as:
No comments yet. Be the first to share your thoughts!